In this Help and Information tutorial, you will see how to install Adobe Acrobat Reader on your computer.
Important: This tutorial is for students outside of a school. For students within a Sun West School Division school, please install Adobe Acrobat Reader from the Application Catalogue. For students in another school division school, please follow your school's procedures for installing programs.
Video Instruction
Written Instruction
Step 01: Close PDF Programs
Close all versions of Adobe Acrobat Reader or any other PDF reader you already have installed. Close any browser tabs that are displaying a PDF, such as a PDF file from one of your courses.
Step 02: Navigate to Adobe's Download Page
Click the button below to navigate to Adobe's download page for Adobe Acrobat Reader. The download page will open in a new tab.
Step 03: Install Acrobat Reader Chrome Extension (Chrome Users Only)
If you are using Google Chrome as your browser, the install page will provide an option to install the acrobat reader Chrome Extension. I recommend leaving the Acrobat Reader Chrome Extension box checked. This extension is useful if you are using Google Chrome, as it allows you to open and work with PDF files directly in Chrome.

Step 04: Choose Optional Offers
Adobe provides additonal software it refers to as Optional Offers. Unless you have a reason to install these, I recommend unchecking the Optional Offers boxes

Step 05: Begin Installation
CLick the Install Now button to begin the installation process

Step 06: Wait for the Installation to Initialize
After beginning the installation, it will initialise. This may take some time, depending on the speed of your Internet connection. You will see the blue initialization bar during this process

Step 07: Save the Installation File
A. Depending on how your browser is configured, the file will download in one of two ways :
- The file will automatically download, saving to the Downloads folder on your computer, or
- A window will pop-up asking you where you want to save the file.
B. Take note of the file name reader_en_xa_cra_install, when you save the file. You will need to open this file later.
C. Click Save to save the file

Step 08: Open the Installation File
Click on the file to open it, once the download is complete. You will click on the file from the location you saved it to in Step 07
Step 09: Permit the Installation
When you open the file, you will be prompted that a program is attempting to chanfe your computer. Click Yes to begin the installation. Adobe Acrobat Reader will automatically download and install all required files on your computer after you click this button
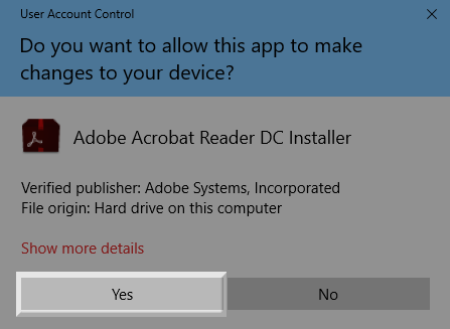
Note: The image above is from Windows 10, If you are using an older version of Windows, you will see a slightly different alert window; however, you will still need to click Yes to permit the installation.
Step 10: Wait for the Installation
Once the installation begins, you will see the installaton bar fill, which is shown in blue in the image below. Wait until this bar is completely filled.


Step 11: Complete the Installation
A. Once the bar is filled, you will be given the option to launch Adobe Acrobat Reader. Simply leave the box check to lauch it.
B. Click Finish to complete the installation and open Adobe Acrobat Reader.

